 Supplies:

1. Multicolored Yarn
2. Initial Beads with a hole big enough for the yarn to go through (also works with other beads)
 3. Masking Tape
4. Scissors
5. Twisty-ties
Directions:
1. Cut three equal pieces of yarn about 24 inches.
2. Tie the three pieces together at one end leaving about an inch above the knot.
3. Tape the string above the knot onto a sturdy surface (make sure surface is safe for tape) so the string will stay in place while you are braiding it.
 4. Begin braiding, keeping your fingers close to the braid so it stays tight.
5. Keep braiding until the braid goes almost all the way around your wrist once.
6. Tie a knot close to the braid, so that it won’t come undone. Make it as tight as possible.
7. Get a twisty-tie and cut off excess plastic so it is just a wire. (Wire must be thin and bendy in order to get through the bead.)
8. Wrap the wire around one piece of the loose string (Kind of like a needle) and use wire to pull string through bead.
9. Do the same with the other two pieces of loose string.
10. Make another knot close to the bead with the loose string so the bead doesn’t move.

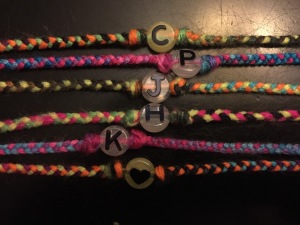
Bracelet with multiple letters
11. You can make bracelets with multiple letters. The more letters you have, the less you have to braid. You can make spaces between words by adding a knot between the beads or a heart or plain bead.
12. Keep braiding until braid is the same length as the first one.
13. Tie knot close to end of braid so it does not come undone.
14. Place the two knots next to each other and cut off the loose ends so that they are the same length (a 1/2 inch to an inch).
15. Tie bracelet on wrist!